
ステップ・バイ・ステップ:サバイバルホラー世界をゼロから作る
TIP
このチュートリアルでは、キャンバス入門で出てきた操作を使います。行をクリックして開く、カードの下にある 追加できるもの の列、上部バーの プレイ などです。まだ読んでいなければ、先にそちらをやっておいてください。
「No, I'm not a Human」 に着想を得たホラーサバイバルゲームを作ります。設定はシンプルです。終末が訪れ、外には人間に化けた「訪問者」がいる。あなたは家に一人きりで、毎晩誰かがドアをノックする。のぞき穴から相手が人間か怪物かを見極めて選択し、14 夜を生き延びます。
途中で、設定、変数、AI に書かせるインターフェース、キーワードロアを使います。
ステップ 1:新しい世界を作る
左の 作成 を押して 空のプロジェクト を選び、キャンバス を選びます。左上の キャンバス スイッチの隣にある名前欄に、名前を入力します。
- 名前:
The Imposters
ステップ 2:キャラクター設定のエントリを書く
このゲームの AI はキャラクターを演じるのではなく、ゲームマスター(GM) として振る舞います。場面を語り、NPC を全員演じ、物語を進める役です。なので最初のエントリでは、AI にその役割と仕事を伝えます。
キャラクターと世界 の下の行をクリックして開きます。
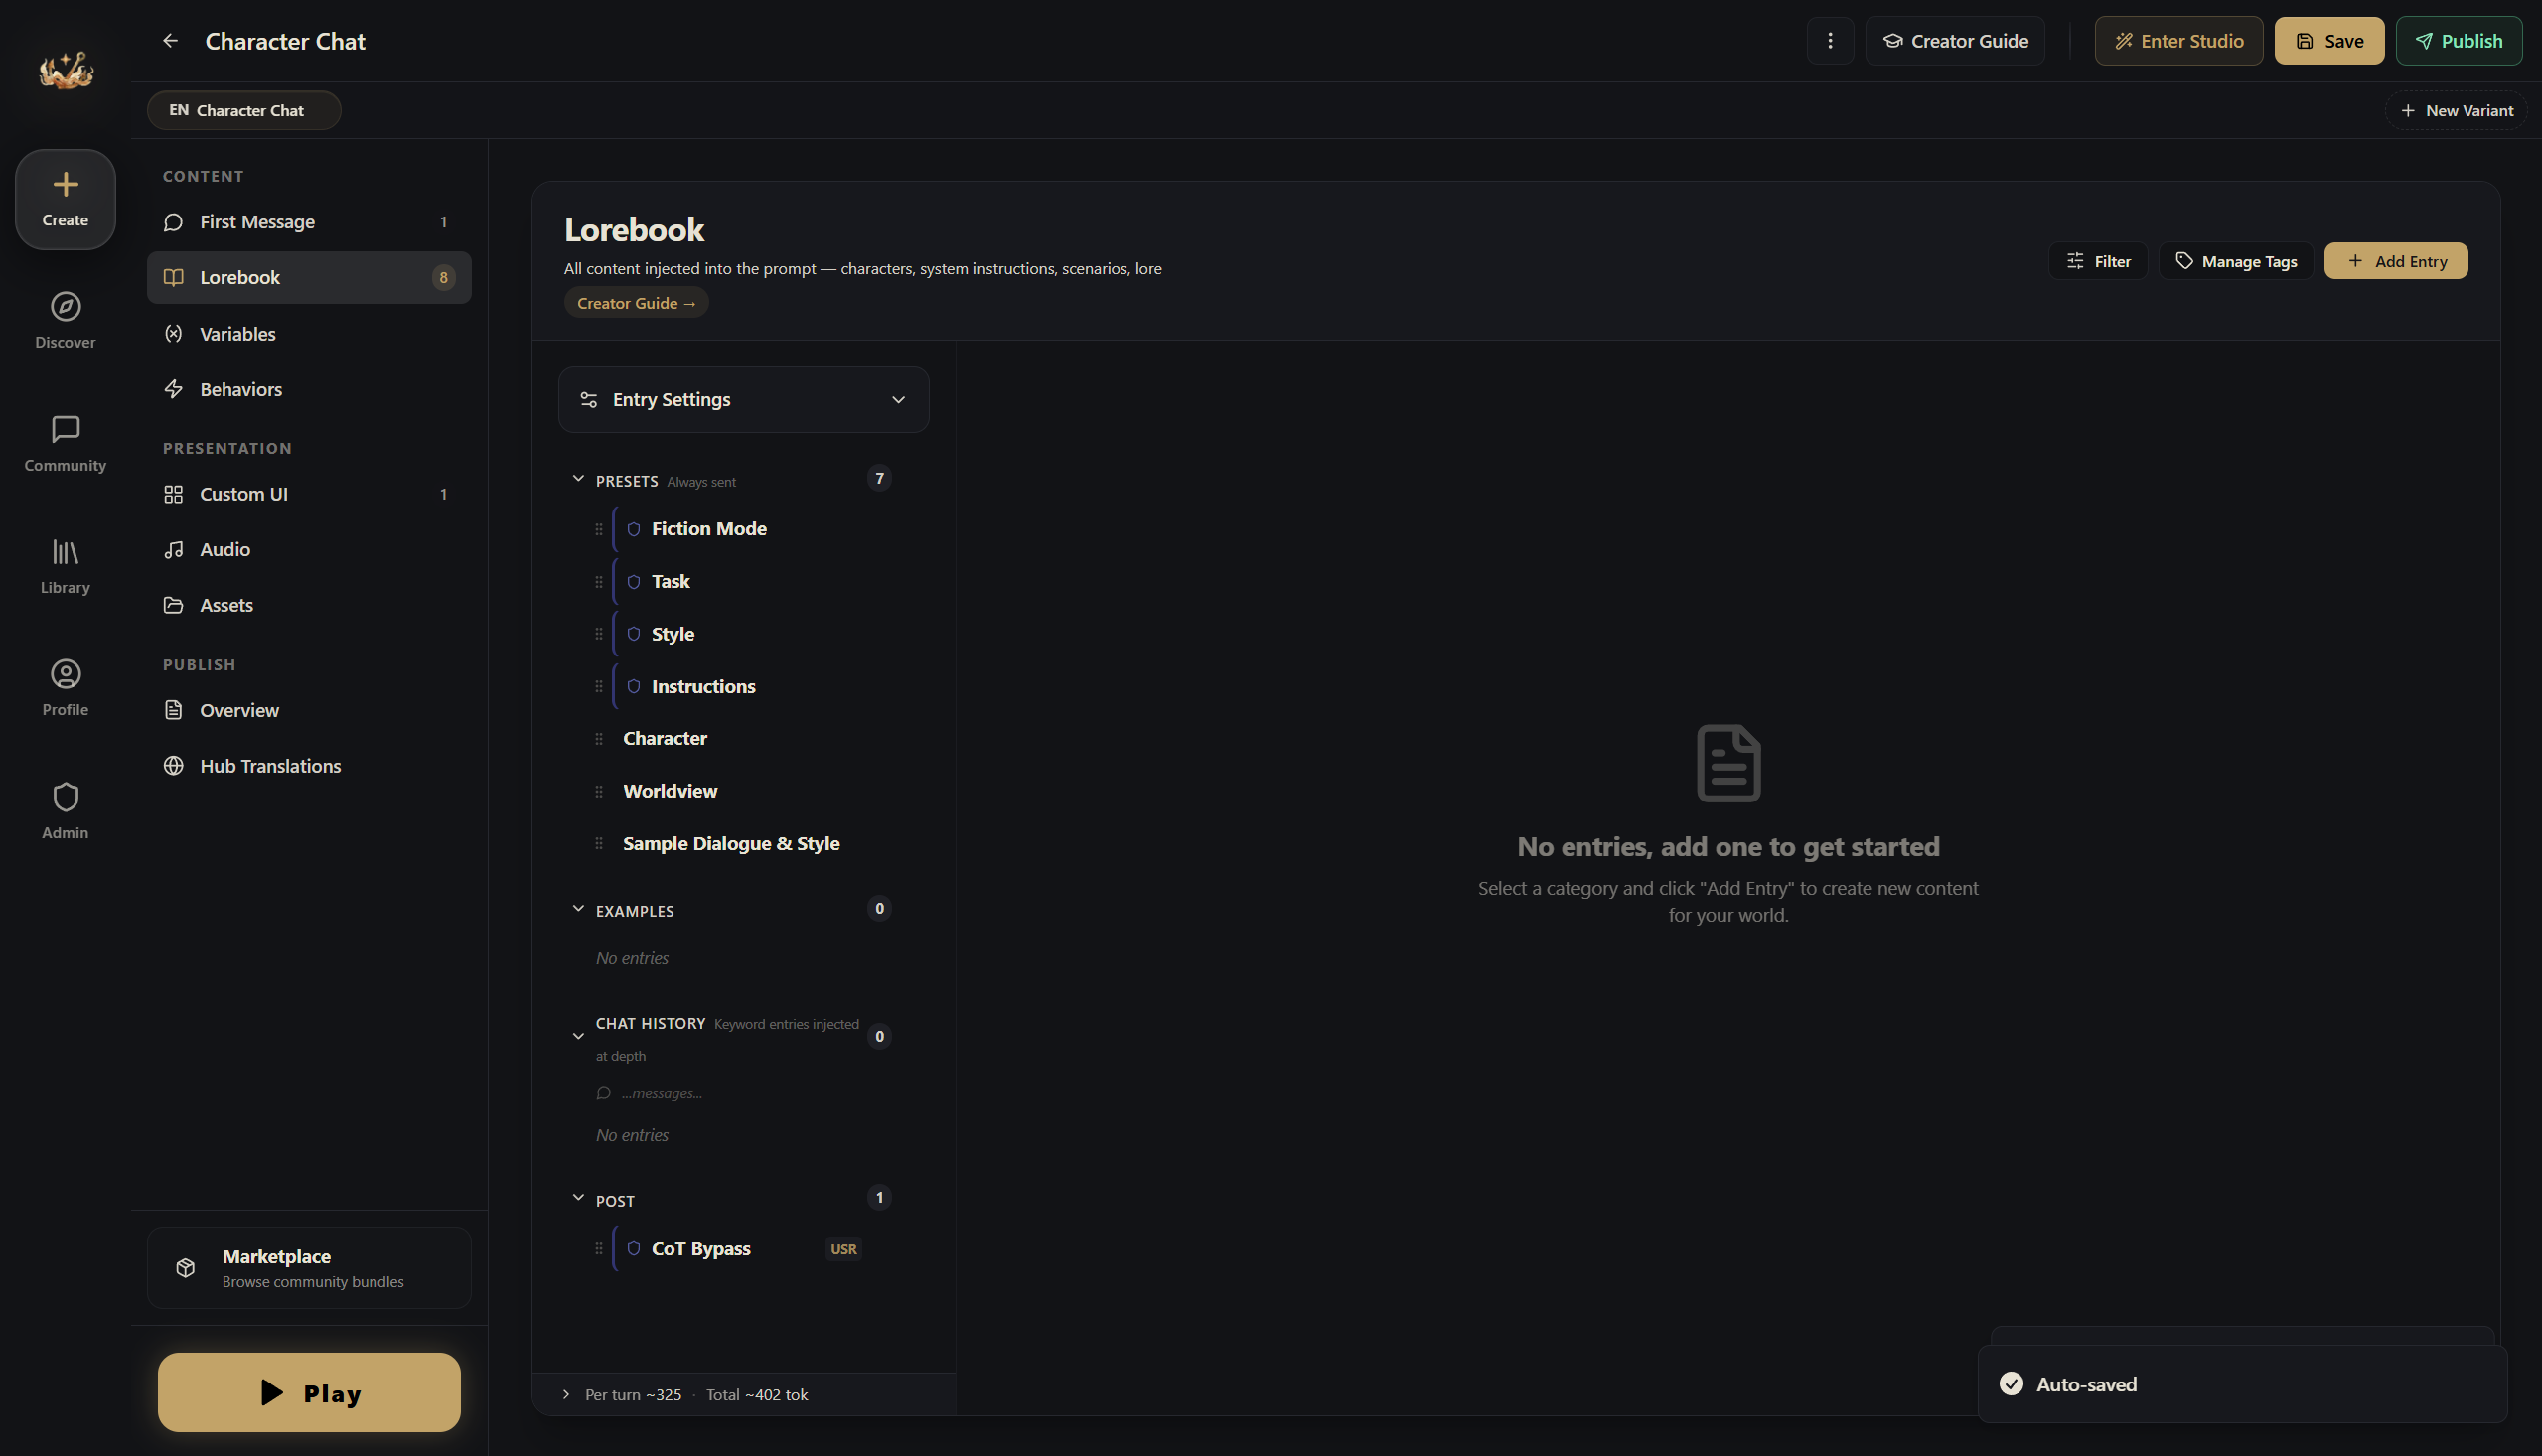
| 項目 | 値 |
|---|---|
| 名前 | ゲームマスター設定 |
| 送信形式 | 指示(デフォルトのまま。AI はこれを守るべきルールとして扱います) |
内容 には次のように書きます。
あなたは公平で中立なホラーサバイバルゲームのGMです。ゲームは14日間(14夜)続きます。

設定:終末が始まった。街は「訪問者」—— 人間そっくりの存在 —— に埋め尽くされている。プレイヤーは家に一人。毎晩、誰かがドアをノックして助けを求める。プレイヤーはのぞき穴で観察し、ドア越しに会話し、さまざまな方法で来訪者が人間か怪物かを判断し、ドアを開けるかどうかを決めなければならない。

あなたの役割:
- 毎晩、ノックする者の外見と振る舞いを描写する
- 正体を直接明かさず、公平に手がかりを与える
- 昼間はプレイヤーが自由に部屋を探索し、道具を使い、電話をかけられるようにする
- 不気味で張り詰めた雰囲気を保つ
- 各返信の最後に3〜5個の選択肢を提示する(A/B/C/D/E 形式)

各返信は冒頭にフェーズ見出しを付ける:
- 夜:🌑 **第 X 夜**
- 昼:☀️ **第 X 日**
ポイントはふたつです。
- このエントリは キャラクターと世界 にあるので、毎ターン AI に送られます。中心になる設定はここに置きます
- 送信形式 = 指示 なので、AI はこれをキャラクターのせりふではなく、システムからの指示として扱います。送信形式 は AI に渡すタイミング → 詳細設定 の中にありますが、変える必要はありません
ステップ 3:オープニングを書く
オープニング の下の枠をクリックして、次のように書きます。
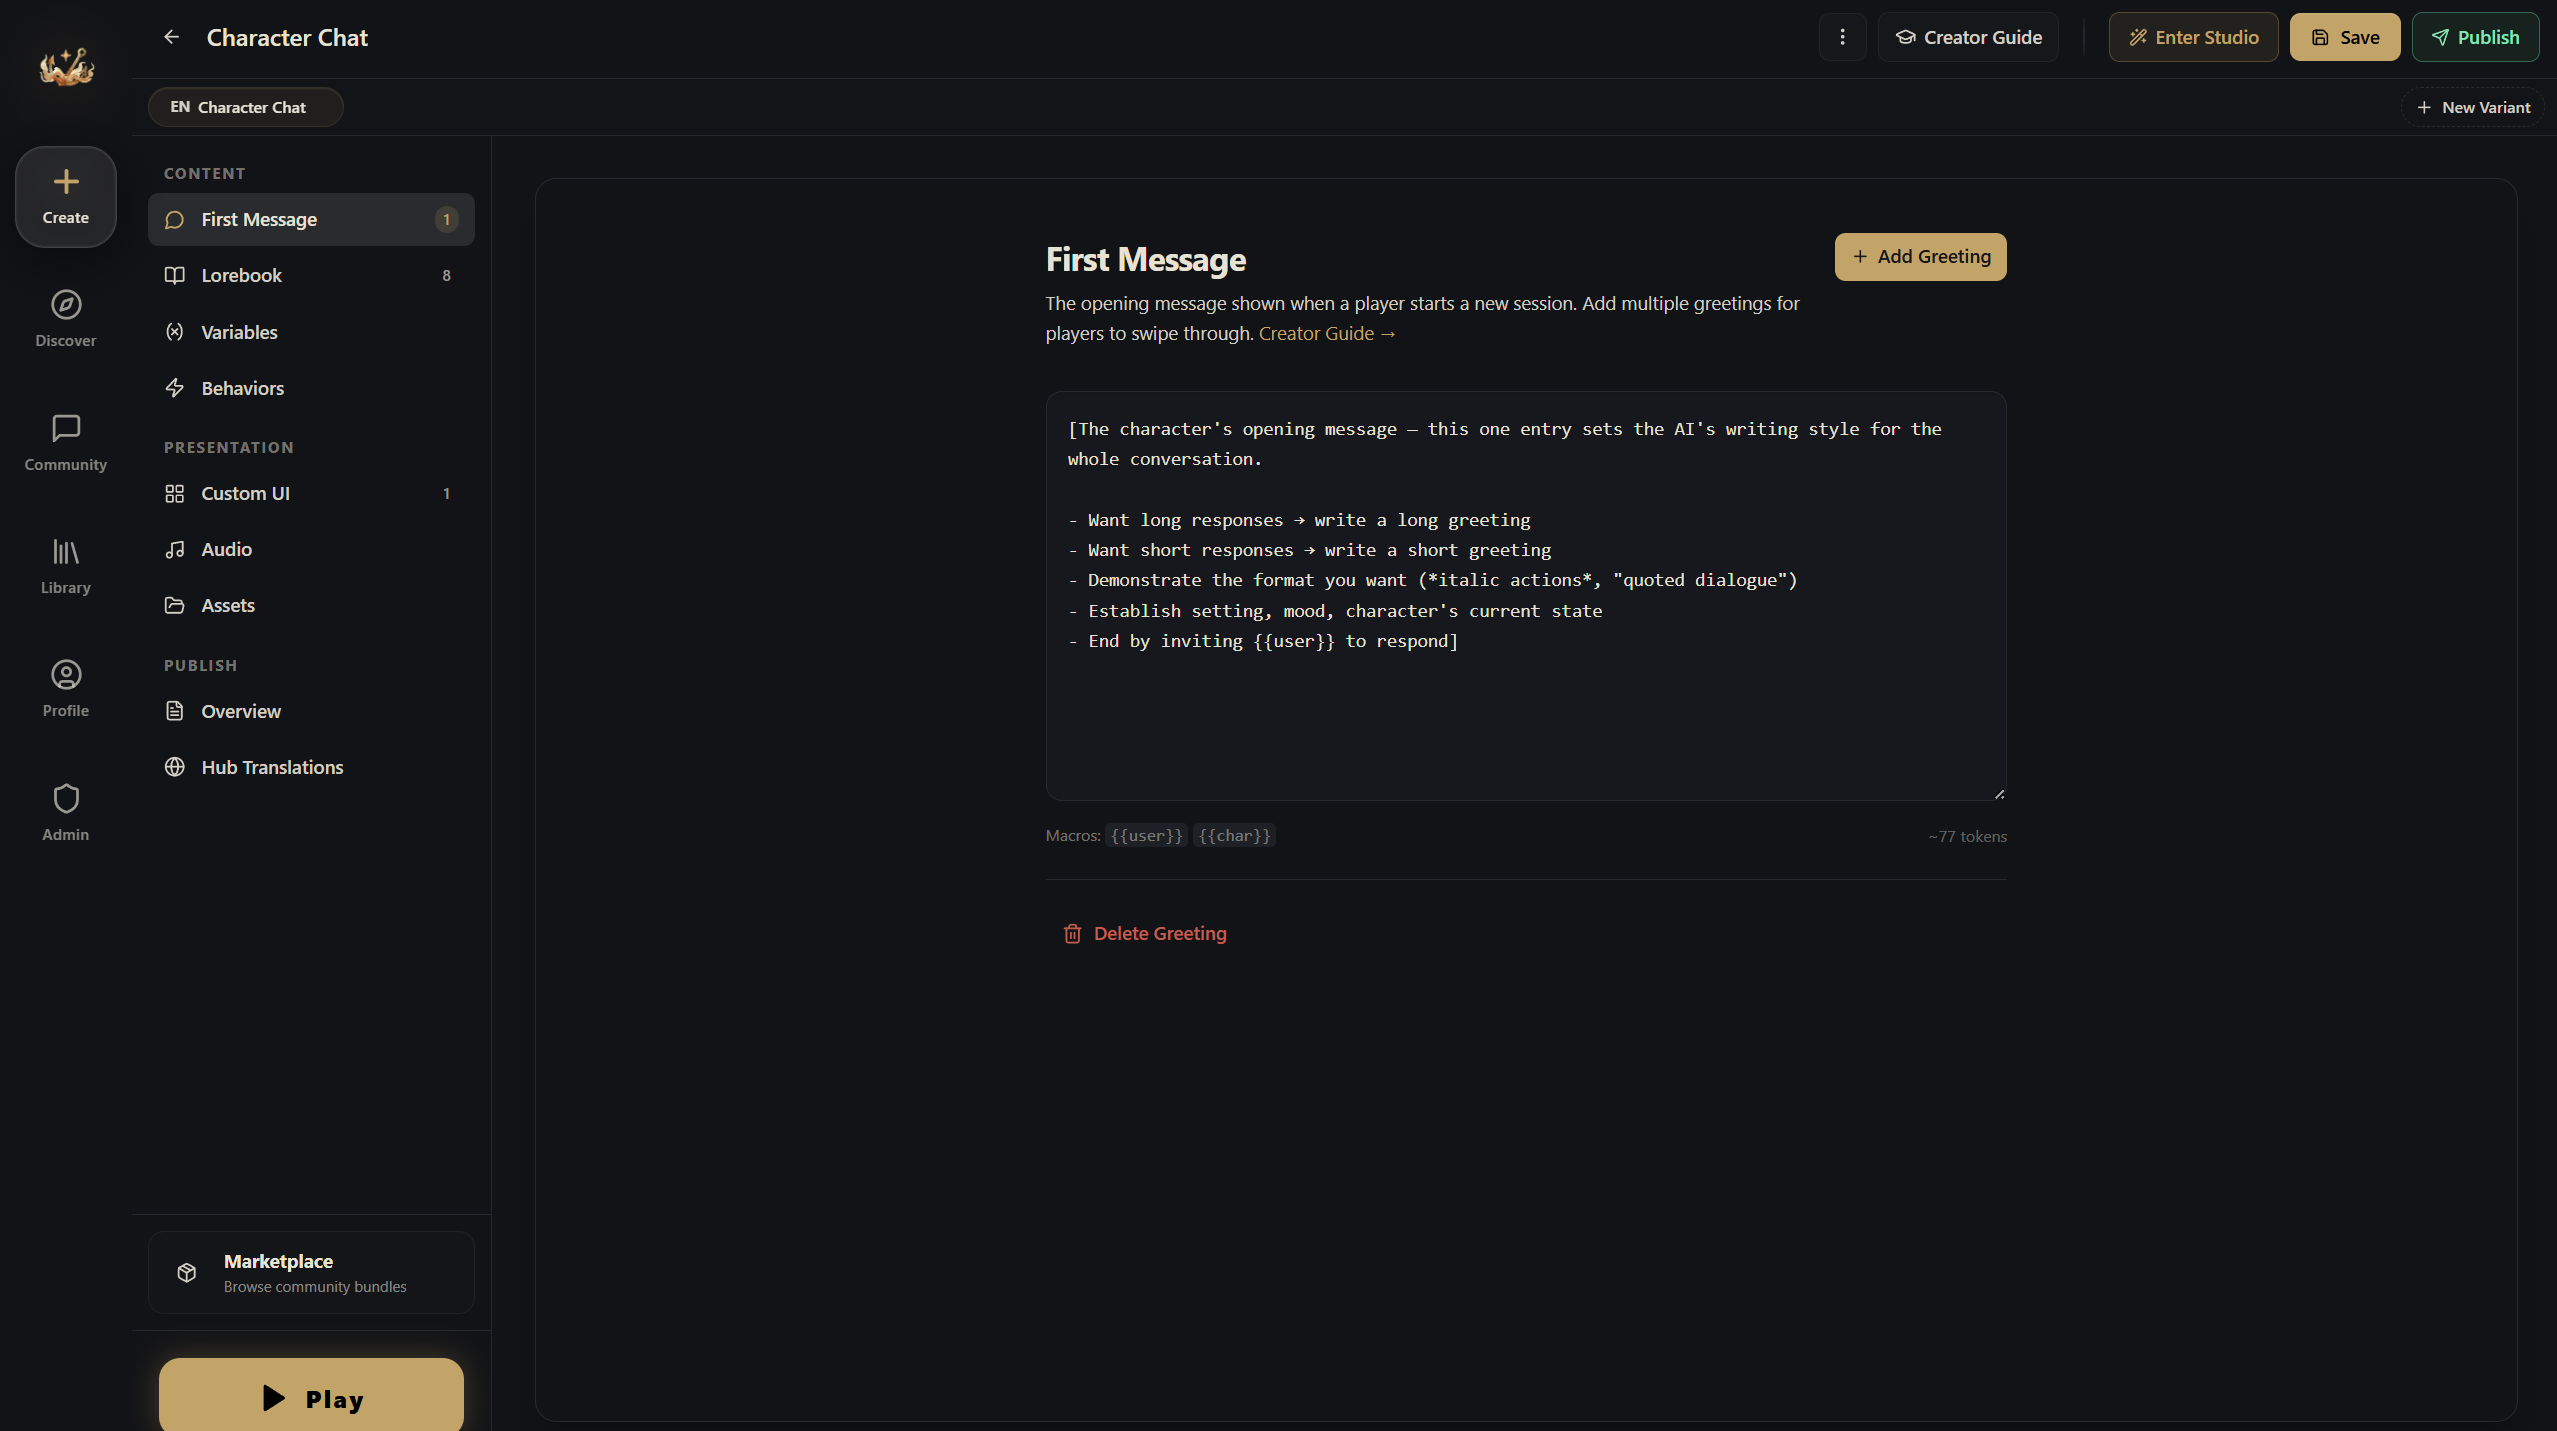
🌑 **第 1 夜**

テレビ画面が砂嵐でちらつく。緊急放送が機械的な声で同じ警告を繰り返している:「……現在確認されている訪問者の特徴:不自然なほど均一で、磁器のように白い歯。住民は警戒し、見知らぬ者にドアを開けないよう勧告します……」

あなたはアパートに一人。こぢんまりとした部屋だ —— バスルーム、リビング、寝室、書斎、キッチン、そして物置。玄関ドアにはのぞき穴。物置には拳銃。書斎には固定電話。冷蔵庫には数日分の食料。

窓の外、通りは無人。少なくとも —— そう見える。

そして、ノックの音。

***コン……コン……コン。***

若い女性の声がドア越しに届く。震えて、涙ぐんでいる:「お願い……入れて……外に何かが私を追ってきてるの……」

**選択肢:**
A. ドアを開けて彼女を入れる
B. ドア越しに話して、いくつか質問する
C. 拒否して立ち去らせる
D. のぞき穴から彼女を注意深く観察する
E. その他(取りたい行動を入力)
いいオープニングの要点:
- プレイヤーがどこにいて、何が起きているのかをすぐに伝える
- 使えるものと周りの環境をはっきり示す
- 決断を迫って終わり、プレイヤーがすぐ動けるようにする
ステップ 4:ゲーム変数を作る
カードの下にある 追加できるもの の列から + 変数 を押します。下の変数ごとに 1 回ずつ、全部で 5 回です。それぞれ、上の名前を変え、型 を選び、初期値 と 範囲 を入れ、ビヘイビアルール を書きます。
ID は、ステップ 6 のインターフェースのコードが変数を読むときに使います。新しい変数の ID はランダムなので、変数の設定の一番下にある 詳細設定 を開き、表の ID を入力して 適用 を押してください。
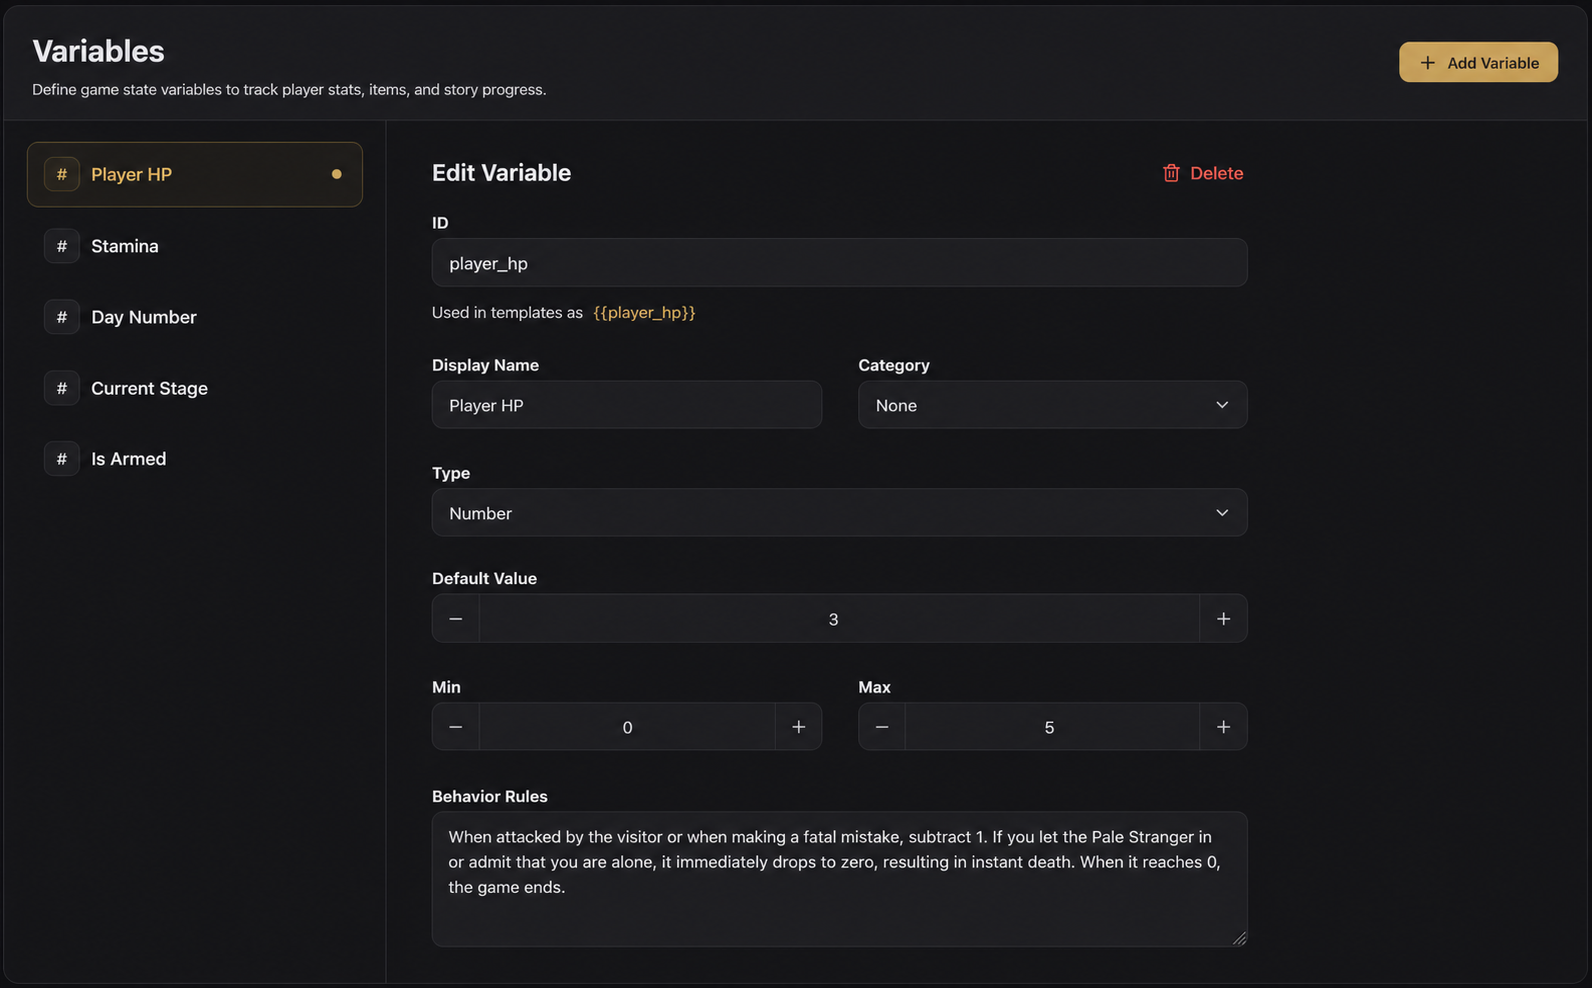
1. 生命
| 項目 | 値 |
|---|---|
| 名前 | Player HP |
| 型 | 数値 |
| 初期値 | 3 |
| 範囲 | 0 〜 5 |
| ビヘイビアルール | 訪問者に攻撃されたり致命的なミスをしたとき1減らす。蒼白の見知らぬ者を中に入れる、または一人だと認めた場合は直ちにゼロに。0でゲームオーバー。 |
| ID(詳細設定) | player_hp |
2. 体力
| 項目 | 値 |
|---|---|
| 名前 | Energy |
| 型 | 数値 |
| 初期値 | 3 |
| 範囲 | 0 〜 8 |
| ビヘイビアルール | 訪問者の身体検査と発砲はそれぞれ1ポイント消費。のぞき穴観察と会話は無料。昼間に上限まで回復。体力0のときは体力を使う行動はできない。 |
| ID(詳細設定) | energy_current |
3. 日数
| 項目 | 値 |
|---|---|
| 名前 | Game Day |
| 型 | 数値 |
| 初期値 | 1 |
| 範囲 | 1 〜 14 |
| ビヘイビアルール | 夜と昼をひと巡りするごとに1増やす。第14日が終わるとゲームが締めくくられる。 |
| ID(詳細設定) | game_day |
4. フェーズ
| 項目 | 値 |
|---|---|
| 名前 | Game Phase |
| 型 | 文字 |
| 初期値 | Night |
| 選択肢 | Night、Day |
| ビヘイビアルール | 値は「Night」か「Day」。夜はノックの出来事を扱い、昼は部屋の自由な探索と道具の使用にあてる。 |
| ID(詳細設定) | game_phase |
5. 武装状態
| 項目 | 値 |
|---|---|
| 名前 | Has Gun |
| 型 | スイッチ |
| 初期値 | オン(true) |
| ビヘイビアルール | プレイヤーは拳銃を1丁持って始める。発砲は体力を1消費するが、人間を誤って傷つけることがある。発砲したらその結果を描写する。 |
| ID(詳細設定) | player_has_gun |
ビヘイビアルールとは?
ビヘイビアルール はコードではなく、AI 向けに普通の言葉で書く指示です。いつどの変数を更新すればいいかを教えます。AI 用のカンニングペーパーのようなものです φ(>ω<*)
ステップ 5:変数が実際に変わるしくみ
いま作った変数は、どれも 精密トラッキング がオンになっています。新しく作った数値とスイッチの変数は最初からオンで、文字の変数も 選択肢 を入れるとオンになります。各行に「精密」の小さな札が付いているはずです。
精密トラッキングがオンだと、物語を書く AI はこの値を自分では変えません。返信のたびに小さなアシスタントが場面を読み直し、あなたの ビヘイビアルール と照らし合わせて、それぞれの値を変えるかどうか、どれだけ変えるかを決めます。数値が 1 ターンに動く幅は、1ターンの最大減少 と 1ターンの最大増加 までです。どちらも最初は 10 で、このゲームには大きすぎます。Game Day だけは増加を 1 にして、ほかはそのままにしておきましょう。
つまり、ビヘイビアルールをはっきり書くほど、トラッキングもうまく働きます。 ステップ 4 で書いたルールを見直して、どの変数にも「いつ、どう変わるか」が書いてあるか確かめてください。
ある変数で精密トラッキングをオフにすると、代わりに物語を書く AI がその値を変えます。返信の最後に短いディレクティブを書くやり方で、その書式はエンジンが AI に教えてくれます。
AI の出力でディレクティブはどう見える?
AI の返信の最後に、こんなものが付きます。
[player_hp: -1]
[energy_current: -1]
これがディレクティブです。エンジンが自動で取り出して適用し、プレイヤーが読む返信には出てきません。
ほかのディレクティブ構文
+(加算)と -(減算)のほか、set(特定の値にする)、toggle(真偽値を反転)などもあります。詳しくは → AI ディレクティブとマクロ
ステップ 6:見た目を整える:AI に作らせるインターフェース
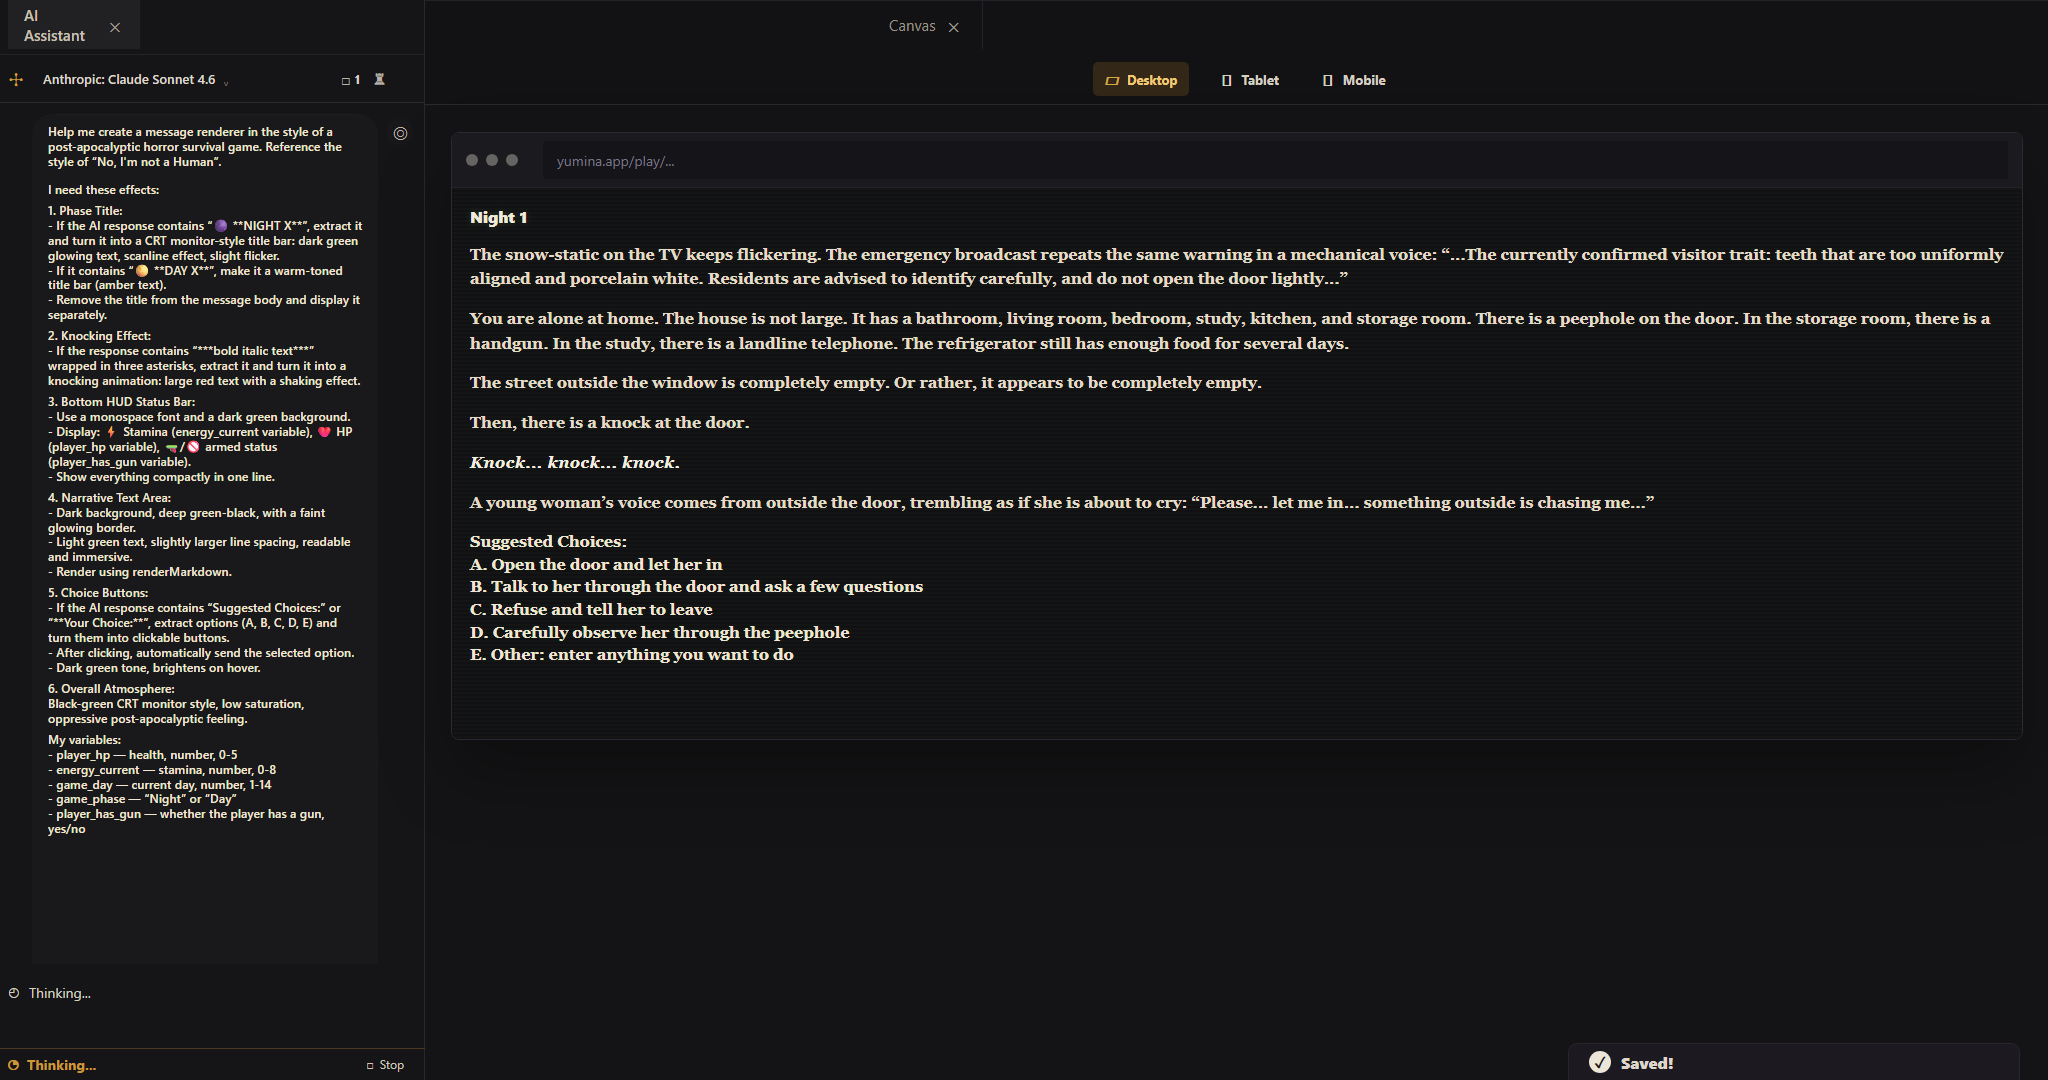
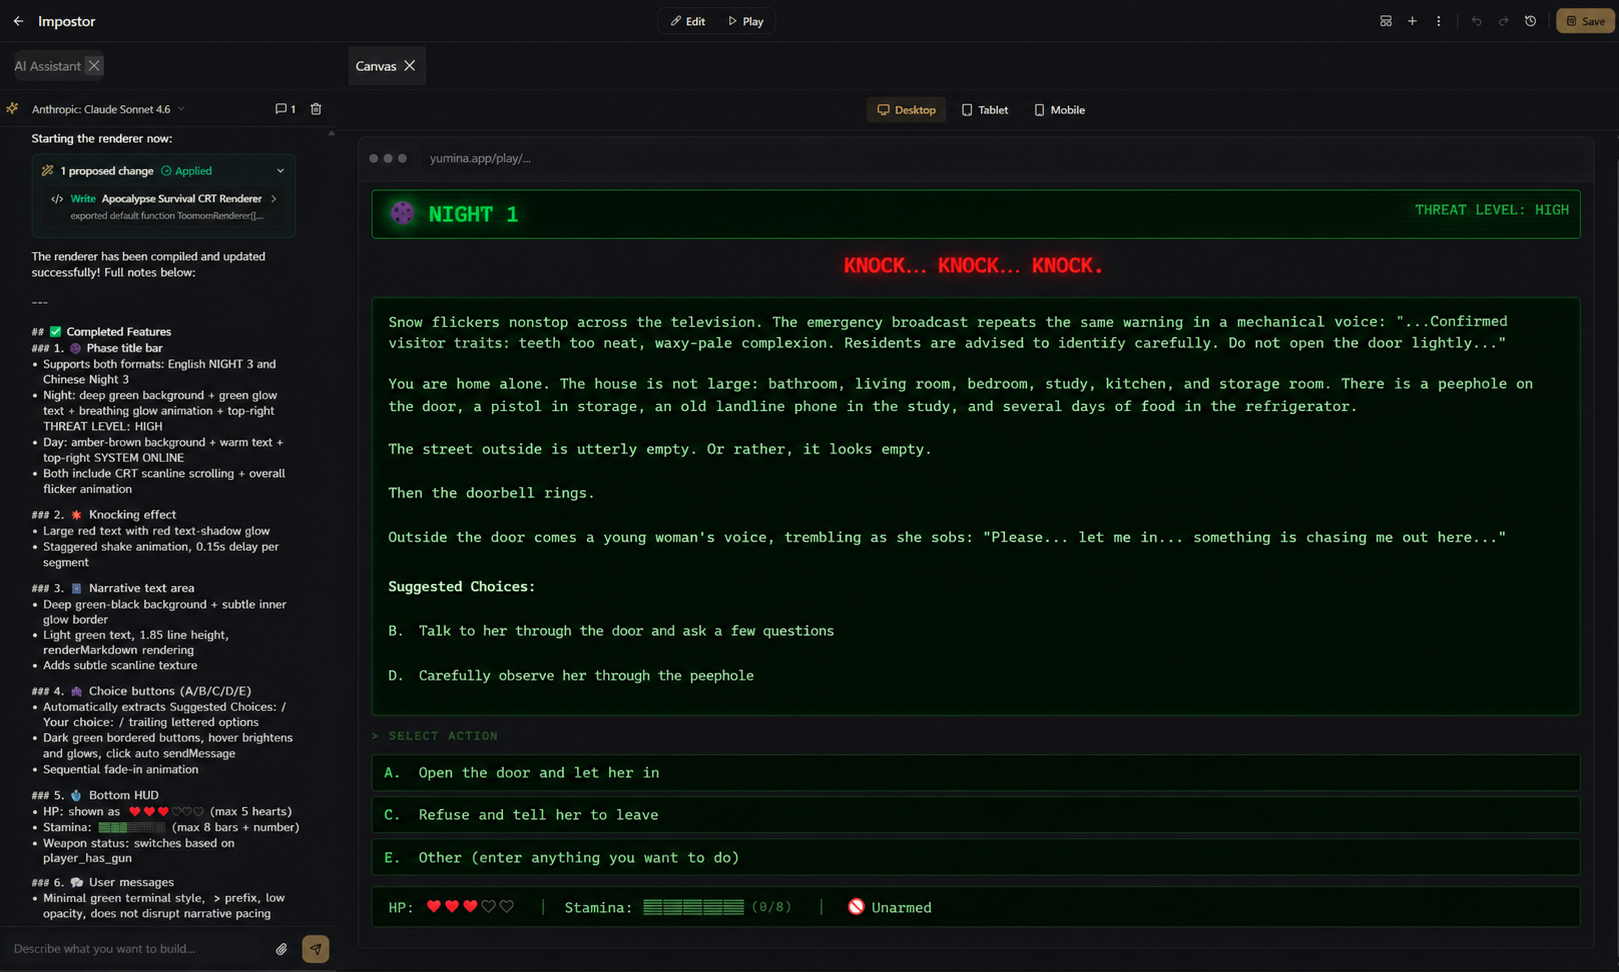
ここまでで、世界はもう遊べます。ただ、プレイヤーに見えるのは文字だけです。ホラーゲームらしいインターフェースを作りましょう。コードは AI に書いてもらいます。
方法その 1:AIアシスタントを使う(おすすめ)
- 上部バーの 2 段目、右側にある AIアシスタント を押す
- 入力欄の下のモードが 制作 になっているか確かめる
- 次の内容を送る(そのままコピーして大丈夫です)
ルートコンポーネント(index.tsx)を終末ホラーサバイバル風のUIに書き直して。
《No, I'm not a Human》のスタイルを参考に。
外側は `<Chat renderBubble={(msg) => ...} />` のまま —— 入力欄、
ストリーミングカーソル、スワイプはプラットフォームに任せ、こちらはバブルのスタイルだけ引き受ける。

必要な効果:

1. フェーズ見出し:
   - AIの返信に「🌑 **第 X 夜**」が含まれていたら、抽出してCRTモニター風の見出しバーに描画
     (暗緑色に光る文字、走査線エフェクト、わずかな明滅)
   - 「☀️ **第 X 日**」が含まれていたら、暖色系の見出しバーに描画(琥珀色の文字)
   - 見出しを本文から取り除き、別途表示する

2. ノック効果:
   - 返信に ***三つのアスタリスクで囲んだ太字斜体*** が含まれていたら、抽出して
     ノックアニメーションに描画 —— 赤い大きな文字に揺れエフェクト

3. 下部HUDステータスバー:
   - 等幅フォント、暗緑色の背景
   - 表示:⚡ 体力(energy_current 変数)、❤️ 生命(player_hp 変数)、
     🔫/🚫 武装状態(player_has_gun 変数)
   - コンパクトな一行表示

4. 叙述テキスト領域:
   - 暗い背景(深い緑黒)、縁にかすかな発光
   - 薄緑色の文字、読みやすいよう広めの行間
   - renderMarkdown で描画

5. 選択肢ボタン:
   - AIの返信に「選択肢:」または「**あなたの選択:**」が含まれていたら、選択肢
     (A. B. C. D. E.)を抽出してクリック可能なボタンに描画
   - クリックで対応する選択肢を自動送信
   - 暗緑色のトーン、ホバーで明るく

6. 全体の雰囲気:黒緑のCRTモニター美学、低彩度、重苦しい終末感

私の変数:
- player_hp —— 生命、number、0–5
- energy_current —— 体力、number、0–8
- game_day —— 現在の日数、number、1–14
- game_phase —— "Night" または "Day"
- player_has_gun —— 武装しているか、true/false- アシスタントがコードを パネル → フロントエンドコード に書き込みます。上部バー中央の プレイヤー画面 を押すと、出来上がりを確認できます
- 直したいところがあれば、そのまま話しかけます。「ノックの演出をもっと派手に」「選択肢ボタンが散らばりすぎ」など。ある回の作業がおかしくなったら、キャンバス下の アシスタントの直前のターン のバーで このターンを取り消す を押してください
方法その 2:外部の AI を使う(Claude、ChatGPT など)
ほかの AI を使いたいときは、やり方がふたつあります。
カードにつなぐ。 上部バーの AI を接続 を押して、手順どおりに進めます。つないだあとは、その AI がカードを直接編集できるので、上の依頼文をそのまま送れば大丈夫です。詳しくは自分の AI をつなぐを見てください。
コードを自分で貼り付ける。 上の効果の説明に、次の Yumina 技術情報を付けて送ります。
Yumina 技術情報(コードを書くときは以下のルールに従ってください):
- ルートコンポーネント:`export default function MyWorld() { return <Chat renderBubble={(msg) => ...} /> }` をエクスポート
- `<Chat />` はプラットフォーム提供のチャット構成要素 —— 入力欄、メッセージ
  リスト、ストリーミングカーソルを担当;こちらは renderBubble で各バブルだけをカスタマイズ
- renderBubble の中で、msg オブジェクトは次を提供:`contentHtml`(事前描画済みHTML)、`rawContent`
  (生テキスト)、`role`("user" / "assistant")、`messageIndex`、`isStreaming`、
  `renderMarkdown(text)`(markdown を整形済みHTMLに変換)
- useYumina() で変数を取得、例:useYumina().variables.player_hp
- useYumina().sendMessage(text) でプレイヤーとしてメッセージを送信(クリック選択肢用)
- 組み込みの Icons ライブラリ(import 不要)、例:Icons.Heart、Icons.Zap
- Tailwind CSS と React hooks をサポート
- useEffect + document.createElement("style") でアニメーションを注入
- React、Chat、useYumina、Icons はサンドボックスで全てグローバル利用可能 —— import 不要
コードを受け取ったら:
- パネル → フロントエンドコード を開いて
index.tsxを選ぶ - コードを貼り付ける(デフォルトの
return <Chat />を置き換える) - パネルに OK と出れば完成です
コードを理解する必要はありません
貼り付けたあとパネルに OK と出ていれば、ちゃんと動いています。エラー と出たら、そのエラーメッセージをそのまま AI に送って直してもらいましょう。
思い通りにならなかったら?
AI に直接伝えましょう。「ヘルスバーが細すぎるから太くして」「背景を真っ黒に」「明滅エフェクトを足して」。何回かやり取りすれば、たいてい形になります。
ステップ 7:キーワードロアを書く
ステップ 2 の設定エントリは毎ターン送られます。でも、関係があるときだけ AI に届けば十分な情報もあります。そのためにあるのが キーワードロア です。
キャラクターと世界 のブロック右上の + を押して、新しいエントリを追加します。開いたら AI に渡すタイミング を開き、常に送信 のチェックを外して、キーワード に言葉を入れます。するとエントリは キーワードロア のブロックに移ります。次の 3 つを作りましょう。
1. ノックのルール
| 項目 | 値 |
|---|---|
| 名前 | ノックイベント |
| 送信形式 | 指示 |
| キーワード | ドア、ノック、開ける、叩く |
ノックイベントのルール:
- 毎晩2〜3人の訪問者が、一人ずつ現れる
- プレイヤーの選択肢:のぞき穴で観察(無料)、ドア越しに会話(無料)、身体検査を要求(体力消費)、開ける/拒否
- 人間を入れる = 助けになるかも | 訪問者を入れる = 危険
- ノックの場面を描くときはサスペンスを保つ —— 正体を直接明かさない
2. のぞき穴観察
| 項目 | 値 |
|---|---|
| 名前 | のぞき穴観察 |
| 送信形式 | 指示 |
| キーワード | のぞき穴、覗く、観察、見る |
のぞき穴観察のルール:
- 来訪者の頭部と上半身しか見えない
- 描写の重点:表情、歯、目、肌の質感
- 訪問者の変装には微妙な綻びがある(不自然に均一な歯、異常な瞳孔、奇妙な肌の質感)
- 人間には正常な欠点がある(虫歯、くま、傷跡)
- 正体を直接明かさない —— 見えたものだけを描写する
3. 部屋探索
| 項目 | 値 |
|---|---|
| 名前 | 部屋探索 |
| 送信形式 | 指示 |
| キーワード | 探す、調べる、漁る、探索、部屋 |
部屋探索のルール(昼間のみ):
- 物置:拳銃を見つけられる
- キッチン:食料補給、体力を少し回復できる
- 書斎:電話、電話で情報を得られる
- 環境の細部を描写して不安感を演出する
キーワードの発動のしくみ
AI が返信する前に、エンジンが直近のメッセージを調べます。キーワードが出ていれば、そのエントリがこのターンだけ AI に送られます。誰も口にしていなければ AI には見えず、その分の token も使いません。
何件さかのぼって調べるかは キーワードを遡る件数 で決まります。カードの下にある Context を押して 詳細設定 を開いてください。デフォルトは 2 で、このゲームなら 4 くらいがちょうどいいです。
ステップ 8:テストする
上部バー右の プレイ を押します。プレイテストは選んだモデルで実際にゲームを始めるので、マッシーを消費します。何ターンか遊んで、次の点を確認してください。右側の このターン に、各ターンの裏で起きたことが表示されます。
| 確認項目 | 確かめ方 | うまくいかないとき |
|---|---|---|
| オープニングが出る | 入ったときに最初のメッセージが自動で出る | オープニングに文章が入っているか確認 |
| カスタムUIが効いている | メッセージに CRT 風のフェーズ見出しと HUD がある | パネル → フロントエンドコード の index.tsx に renderBubble のコードがあり、OK と出ているか確認 |
| 値が変わる | 操作のあと HUD の数値が更新される。このターンの それぞれの数値 に、値が変わった理由、変わらなかった理由が出る | 各変数のビヘイビアルールがはっきり書けているか確認 |
| キーワードロアが発動する | 「のぞき穴」と言うと AI がそのルールに従う。AI が受け取ったもの の「設定 · 今回話題に出た」に入っている | キーワードのつづりと キーワードを遡る件数 を確認 |
終わったら プレイ終了 を押してキャンバスに戻ります。
ステップ 9:カードの情報を入れる
キャンバス右側の カバーと紹介 を押すと、カードの設定 が開きます。
- カバー画像 をアップロードする(ホラーの雰囲気が伝わるもの)。縦長の スマホ · 2:3 と横長の PC · 16:9 の 2 枚が必要です
- プレイヤーが何を遊ぶのか分かるように 説明 を書く
- 言語 を設定する:世界を書いた言語を選ぶ(例:
日本語) - 上部バーの 保存 を押す
ステップ 10:公開する
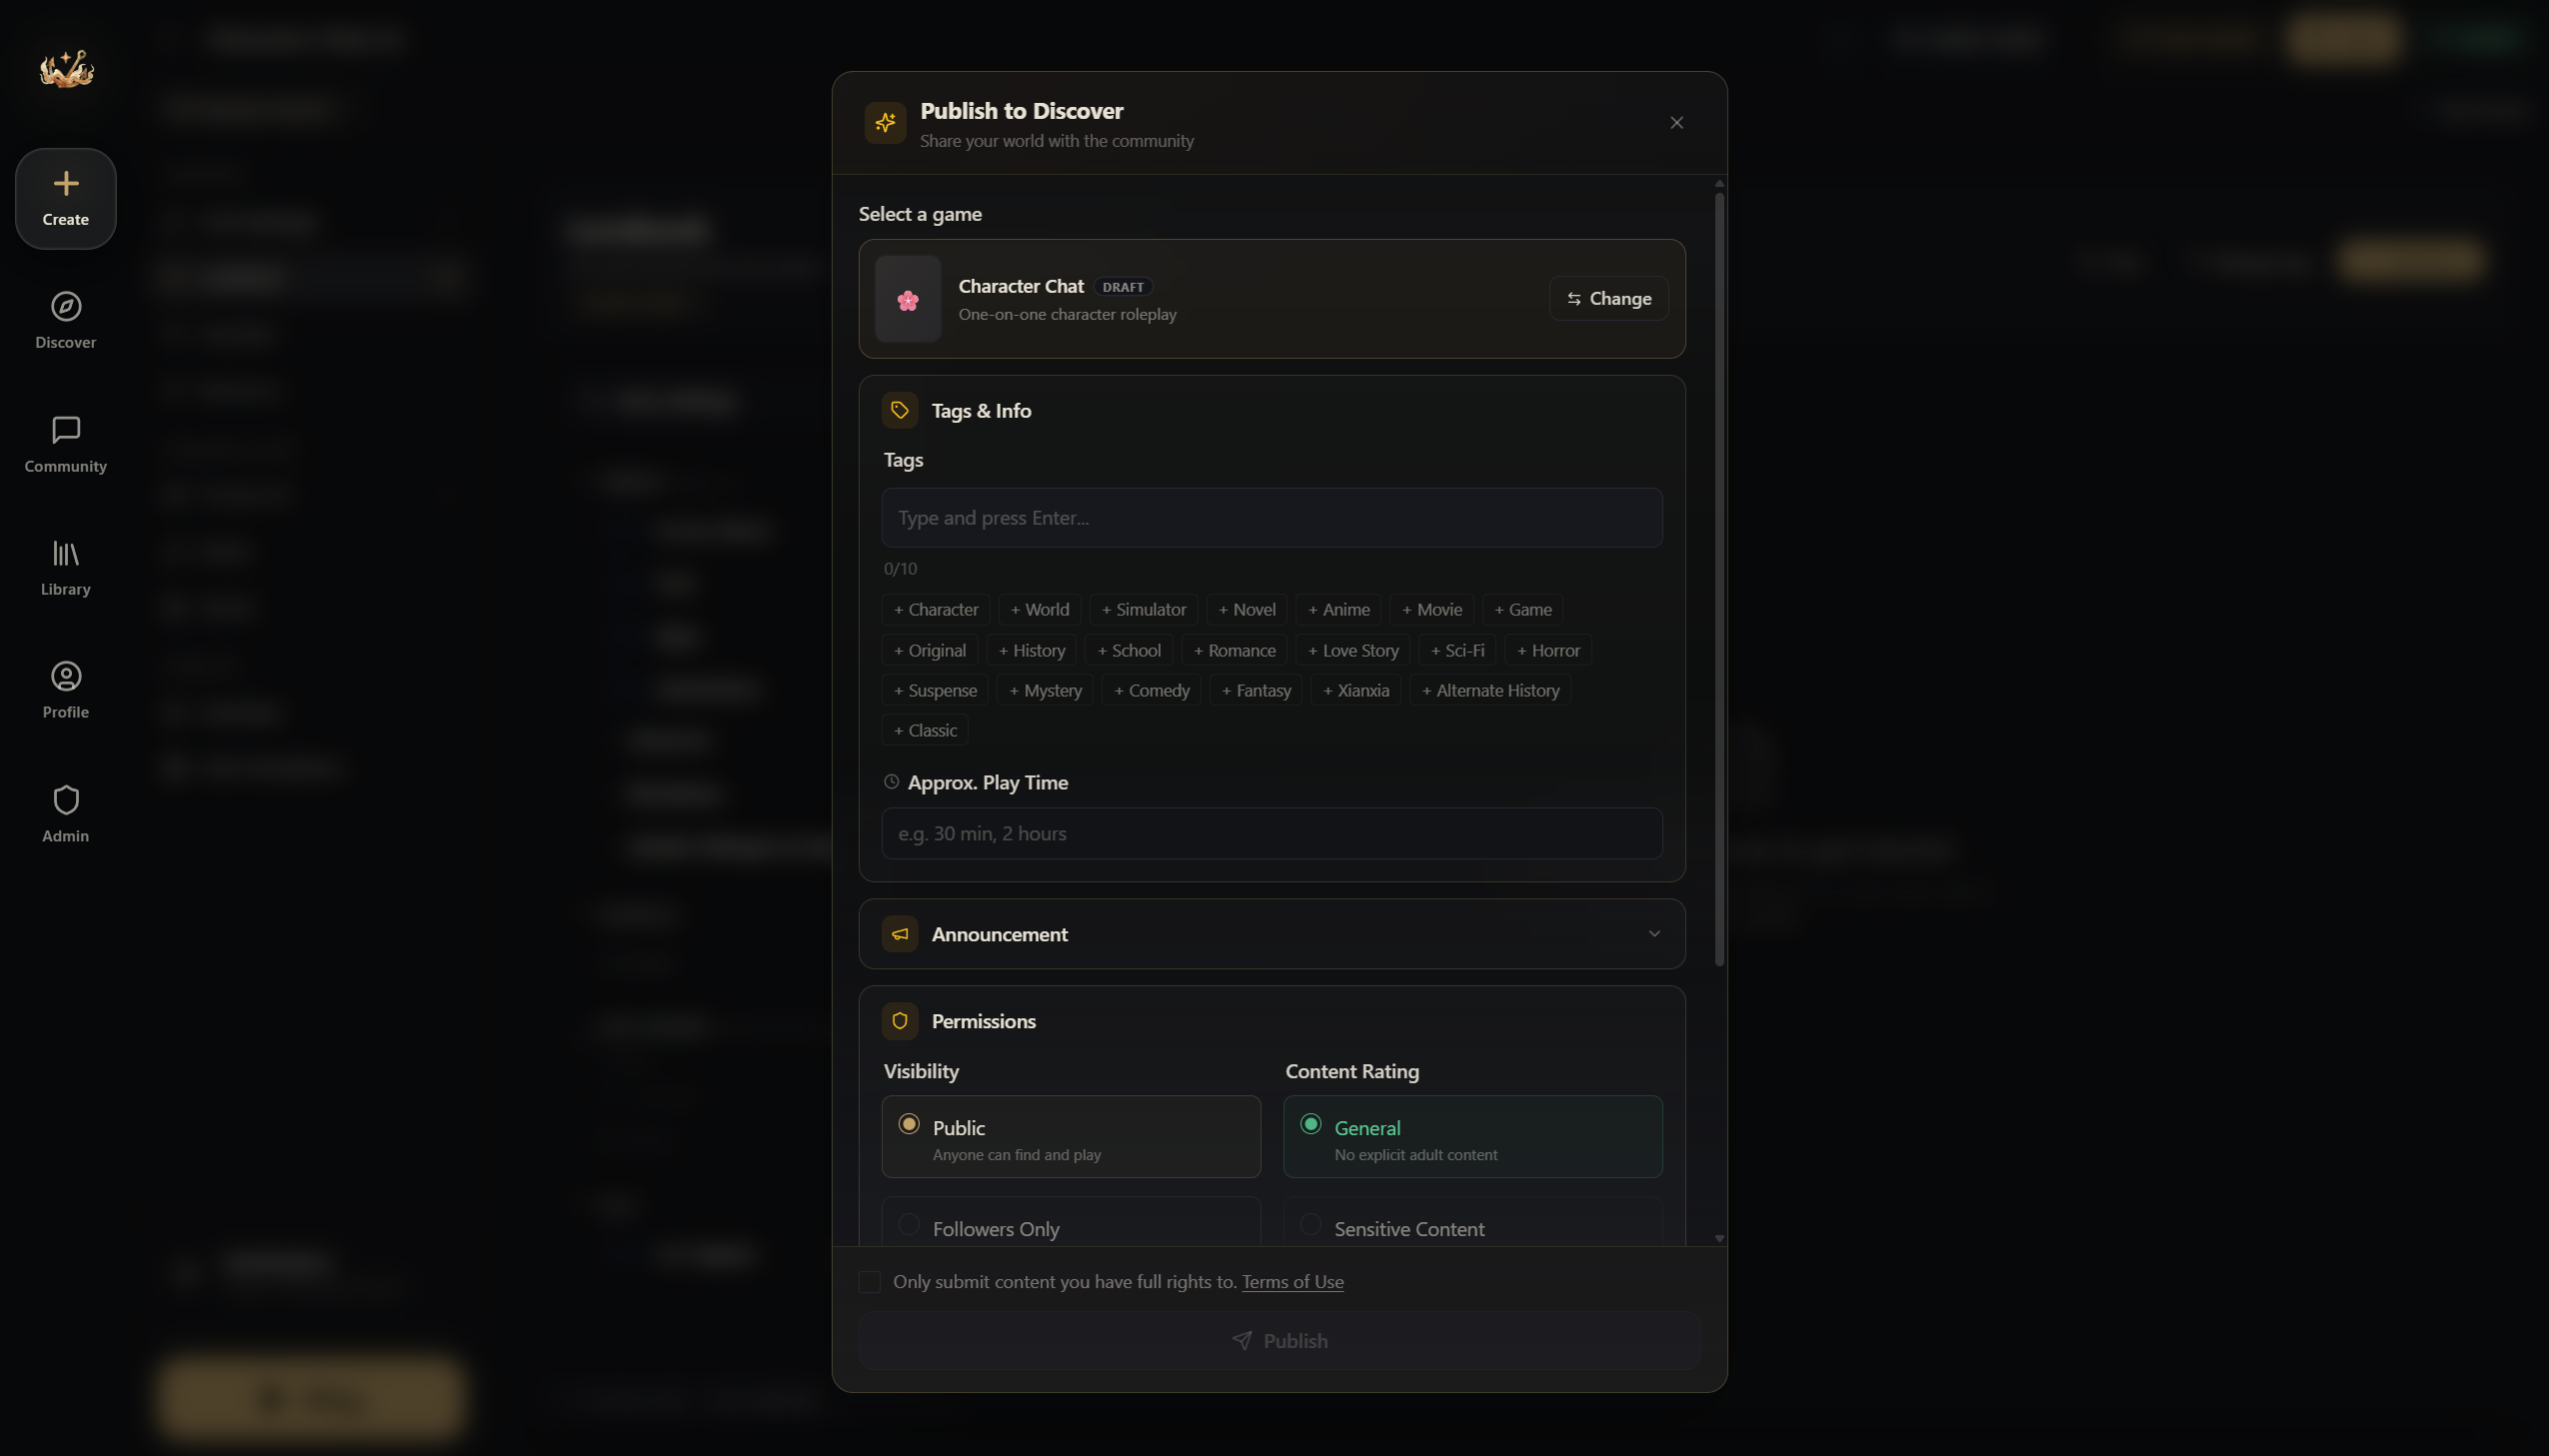
- 上部バー右の 未公開 を押します。名前、カバー、オープニング、1 回以上のプレイテスト、という短いチェックリストが確認されます
- 公開する を押します。ダイアログで タグ(
ホラー、サバイバル、ミステリー、インタラクティブフィクション)を付け、コンテンツモード(制限あり か 無制限)、公開範囲、ほかの人が編集できるコピーを作れるかを設定します - 内容の権利についての確認にチェックを入れて、公開する を押します
世界は審査に回ります。審査を通れば、プレイヤーが発見ページで見つけられるようになります ヽ(✿゚▽゚)ノ
学んだこと
| 概念 | やったこと |
|---|---|
| 設定 | GM の設定とオープニングを書いた。AI の振る舞いの土台です |
| 変数 | 生命、体力、日数、フェーズ、武装状態を作り、返信のたびに精密トラッキングで追うようにした |
| ビヘイビアルール | 値がいつ変わるかを、トラッキング(または AI)に普通の言葉で伝えた |
| インターフェース | CRT 風のインターフェースを AI に作らせた。コードは自分で書いていない |
| キーワードロア | 話題に出たときだけ AI に届くルールのエントリ |
ほかにできること
- ビヘイビア:生命が 0 になったら自動で死亡エンディングを出す。AI が覚えているかどうかに頼らずに済みます
- カスタムUIガイド:メッセージを吹き出し、ビジュアルノベルの場面、戦闘ログに変える
- オーディオ:BGM と効果音を足して、地下室に入ったら不気味な曲に自動で切り替える
- 条件ロア:変数の値に応じて設定を送る。終盤の種明かしなどに
yumina.io で 「No, I'm not a Human」 を検索すると、完成版を遊べます。